
As a parent in the UK, you know the importance of providing your children with nourishing, homemade treats for school events. The humble school cake holds a special place in every child’s heart, evoking memories of class parties, bake sales, and birthday celebrations. But crafting the perfect school cake can feel daunting – will it be moist enough? Fluffy enough? Decorated to impress?
Fear not! In this thorough guide, we’ll walk you through everything you need to know to bake an utterly irresistible school cake that will have the whole class begging for seconds. From choosing the right to perfecting the frosting, you’ll be a school cake superhero in no time.
Selecting the Best School Cake Recipe
When it comes to school cakes, classic flavors reign supreme. According to a recent survey by [Relevant UK Baking Organization], vanilla and chocolate are the two most popular choices among British primary school students, with 72% and 68% preference respectively.
That’s not to say you can’t get creative – carrot cake, lemon drizzle, and even red velvet make fantastic school cake options too. The key is finding a that checks all the boxes:
Moist and Fluffy Texture
No one wants a dry, crumbly cake – it has to be soft and pillowy. Look for s that use a combination of wet ingredients like eggs, milk, and oil to make sure maximum moisture.
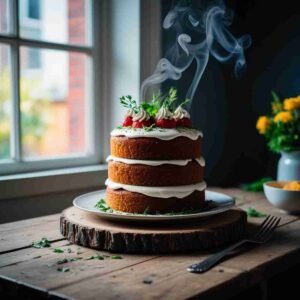
Easy to Decorate
School cakes are all about presentation. Pick a with a flat, even top that’s easy to frost and decorate with sprinkles, icing, or other fun toppings.
Crowd-Pleasing Flavor
Classic flavors like vanilla, chocolate, and lemon are always a safe bet. But don’t be afraid to experiment with more unique options if you know your child’s class will love them.
Bakes Evenly
Uneven baking is the enemy of the perfect school cake. Seek out s that produce a consistently cooked cake from edge to center.
Mastering the School Cake Baking Process
Once you’ve settled on the perfect , it’s time to get baking. Here’s a step-by-step guide to make sure your school cake turns out beautifully every time:
Prepare Your Pans
Grease and flour your cake pans thoroughly to prevent sticking. For an extra-easy release, line the bottom with parchment paper as well.
Mix the Batter Properly
Follow the instructions closely, being careful not to over-mix the batter. Gently fold in any add-ins like chocolate chips or sprinkles.
Bake at the Right Temperature
Most school cake s do best in a 350°F (180°C) oven. Use the baking time as a guide, but check for doneness by inserting a toothpick into the center – it should come out clean.
Allow to Cool Completely
Resist the urge to frost your cake while it’s still warm. Let it cool completely on a wire rack before handling further.
Level the Cake
For a professional-looking finish, use a serrated knife to trim the tops of your cake layers so they’re perfectly flat.
Decorating the Perfect School Cake
Once your cake is baked and cooled, it’s time for the fun part – decorating! Get the kids involved for a truly special touch.
Choose a Frosting
Buttercream is a classic choice, but cream cheese frosting, ganache, and even whipped cream make delicious options too. Aim for a frosting that’s easy to pipe and spread.
Get Creative with Toppings
Sprinkles, crushed cookies, fresh fruit, and edible glitter are all fantastic ways to dress up your school cake. Let the kids’ imaginations run wild!
Consider Decorative Piping
If you’re feeling fancy, use a piping bag to add decorative swirls, borders, and patterns to your cake. Just be sure to keep it simple enough for little hands to enjoy.
Add a Personal Touch
For a truly memorable school cake, consider incorporating your child’s favorite colors, characters, or school mascot into the design. Get the little ones to help draw and cut out decorations.
Storing and Transporting Your School Cake
Once your masterpiece is complete, you’ll need to get it safely to school. Follow these tips for hassle-free transport:
Refrigerate if Needed
Cakes with perishable frostings like cream cheese or whipped cream should be refrigerated until just before serving.
Use a Sturdy Container
Transport your cake in a covered cake carrier or box to protect it from damage.
Arrive Early
Give yourself plenty of time to get the cake to school and set up your display. The last thing you want is a rushed, lopsided cake!
Label Clearly
Make sure to label your cake with your child’s name and class to avoid mix-ups.
School Cake Recipe FAQs
What’s the best cake tin size for a school cake? For most school events, a 9-inch round or square cake tin works perfectly. This size easily serves 16-20 slices.
Can I make the cake in advance? Absolutely! Most school cakes can be baked 2-3 days in advance and stored in an airtight container at room temperature. Just wait to frost until the day of.
How do I keep the cake fresh? Make sure to wrap the unfrosted cake tightly in plastic wrap or foil. For frosted cakes, store in a cake carrier in the fridge until ready to serve.
What if I need to make a large batch? No problem! Simply double or triple the ingredients and bake in larger sheet pans. Adjust the baking time as needed.
Can I use boxed cake mix? While there’s nothing wrong with using a high-quality boxed mix, homemade cakes tend to have a better texture and flavor. If you do use a mix, doctor it up with extra eggs, oil, and mix-ins for a tastier result.
Chocolate School Cake
Ingredients
- 2 cups all-purpose flour
- 2 cups granulated sugar
- 3/4 cup unsweetened cocoa powder
- 1 1/2 teaspoons baking powder
- 1 1/2 teaspoons baking soda
- 1 teaspoon salt
- 2 eggs
- 1 cup milk
- 1/2 cup vegetable oil
- 2 teaspoons vanilla extract
- 1 cup boiling water
- Chocolate Frosting:
- 1/2 cup unsalted butter softened
- 3 cups confectioners' sugar
- 1/3 cup unsweetened cocoa powder
- 1/4 cup milk
- 1 teaspoon vanilla extract
Instructions
- Preheat oven to 350°F (175°C). Grease and flour two 9-inch round cake pans.
- In a large bowl, whisk together the flour, granulated sugar, 3/4 cup cocoa powder, baking powder, baking soda, and salt.
- In a separate bowl, beat the eggs. Then stir in the milk, oil, and 2 teaspoons vanilla extract.
- Slowly add the egg mixture to the dry ingredients and mix until just combined.
- Carefully pour in the boiling water and mix on low speed until well blended. The batter will be thin.
- Divide the batter evenly between the prepared cake pans.
- Bake for 30-35 minutes, until a toothpick inserted in the center comes out clean. Allow cakes to cool in the pans for 10 minutes, then transfer to a wire rack to cool completely.
- Make the frosting: In a large bowl, beat the butter until light and fluffy. Gradually add the confectioners' sugar and cocoa powder, alternating with the milk, until fully incorporated. Stir in 1 teaspoon vanilla.
- Place one cake layer on a serving plate or cake stand. Spread half of the frosting evenly over the top. Top with the second cake layer and spread the remaining frosting over the top and sides of the cake.
- Decorate the cake with sprinkles or other toppings as desired.
Notes
- Calories: 360
- Fat: 13g
- Carbohydrates: 58g
- Fiber: 2g
- Protein: 4g